Shoulder pain self-diagnoses you can do at your home.
Suffering from shoulder pain? You have come to the right place.
Shoulders are one of the most complex and vulnerable joints in our body. Given the complicated anatomy and range of muscles and movement involved, it is a miracle we do not run into shoulder trouble often.
Most people with underlying shoulder issues experience pain when they are performing a physically intensive task. Compromised shoulder movement due to stiffness or pain can cause substantial disability and affect an individual’s ability to carry out daily activities.
Occupations that require a person to perform repetitive tasks, lift heavy loads, and cause shoulder vibrations are associated with a higher risk of shoulder disorder.
How the shoulder works
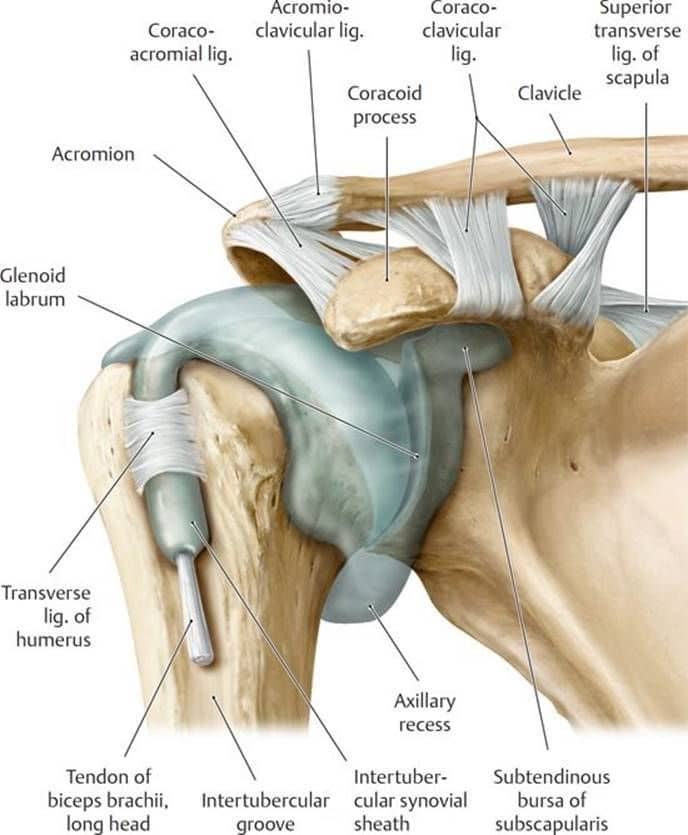
The shoulder is a ball-and-socket joint that has three main bones: the humerus (long arm bone), clavicle (collarbone), and scapula (also known as the shoulder blade).
The three bones are cushioned by cartilage. Further, there are two main joints:
- Acromioclavicular – Located between the highest part of scapula and clavicle.
- Glenohumeral (aka shoulder joint) – Made up of top, ball-shaped part of the humerus bone and outer edge of the scapula.
Fun fact: The should joint (glenohumeral) is the most mobile join in your body.
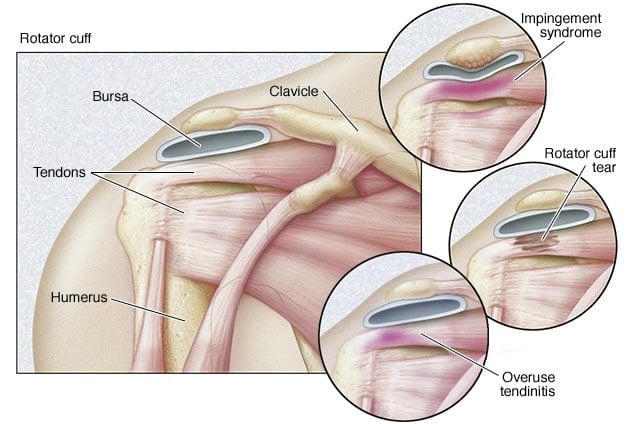
Rotator Cuff
Shoulders get their range of motion from the rotator cuff. The stiffer a person’s rotator cuff, the more restricted his range of motion will be. The rotator cuff is made up of four tendons.
But what are tendons, you ask?
Tendons are tissues that connect muscles to bone. If tendons or bones around the rotator cuff are swollen or damaged, it might be painful or difficult to lift your arm over your head.
Symptoms of a Shoulder Injury
The ball-and-socket structure of the shoulder gives you a great range of motion, but it comes at the expense of stability.
The shoulder joint is the most dislocation-prone in your body. On top of that, repeated stress (at work or while playing sports) can lead to tears and other shoulder injuries.
A preliminary shoulder injury test includes asking yourself the following questions:
- Can you move your arm normally, or is your shoulder too stiff or painful?
- Is your shoulder strong enough for routine tasks?
- Do you feel that your shoulder could pop out of the socket?
Related: Get Bulletproof Shoulders with this Essential Stability Workout Program
Self-Diagnoses For Shoulder Pain
Here are a few simple DIY shoulder tests that can help determine the reason behind your shoulder pain. You will need the help of a partner to perform these shoulder self-diagnoses.
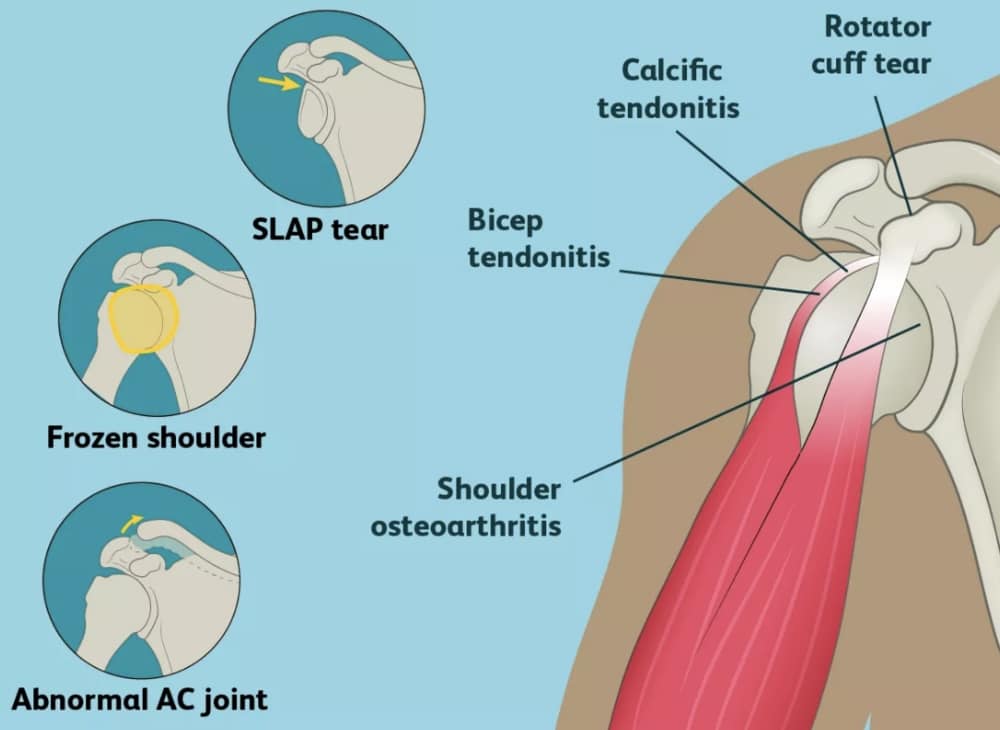
1. Supraspinatus Tear (Empty Can Test)
The empty can test is a common shoulder pain self-diagnose exam. The diagnostic is used to assess the status of the supraspinatus (one of the four rotator cuff muscles).
The muscle is used in arm abduction (raising) and is located on the upper part of the shoulder joint.
Steps:
- Sit on a chair with your arms at your sides and hands supinated (palms facing forward).
- Lift the sore arm forward and to the side at about 30-45 degrees.
- Slowly turn your wrist (as if you were trying to empty a glass of water) until your palm faces down to the floor.
- In this position, get your partner to slowly push your arm down while you attempt to resist the force.
If you feel pain or are not able to maintain the arm position due to weakness, you may have a supraspinatus tear.
2. Labrum Tear
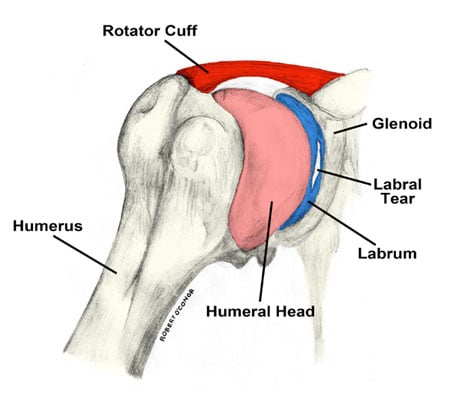
The shoulder labrum is a thick piece of tissue attached to the rim of the shoulder socket that helps keep the ball of the joint in place. It can tear in three ways:
- Completely off the bone.
- Within or along the edge of the labrum.
- Where the bicep tendon attaches.
The labrum tear test for shoulder pain has two parts: the apprehension test and the relocation test.
Apprehension Test:
- Lie down on your back on a flat and elevated surface.
- Move your arm out to the side so that it is perpendicular to your torso and parallel to the floor.
- Flex your elbow so that your upper arm is at a ninety-degree angle with your lower arm.
- Your partner should slowly rotate your arm so your hand moves toward your ear. Make sure you are maintaining the ninety-degree elbow flexion throughout the test.
If you are apprehensive (hesitant) about shoulder movement beyond the joint, this test is considered positive for a possible labrum tear.
Relocation Test:
In some cases, you might feel your shoulder is unstable and wants to move out of the socket or relocate – especially during extreme external rotation.
If you are facing the same problem, have your partner gently press on the front of your shoulder to relocate the joint.
After this, if you feel less relocation and your shoulder feels in place and more stable, then this test is considered positive.
Also Read: 5 Things You Should Never Do During Shoulder Workouts
3. Impingement
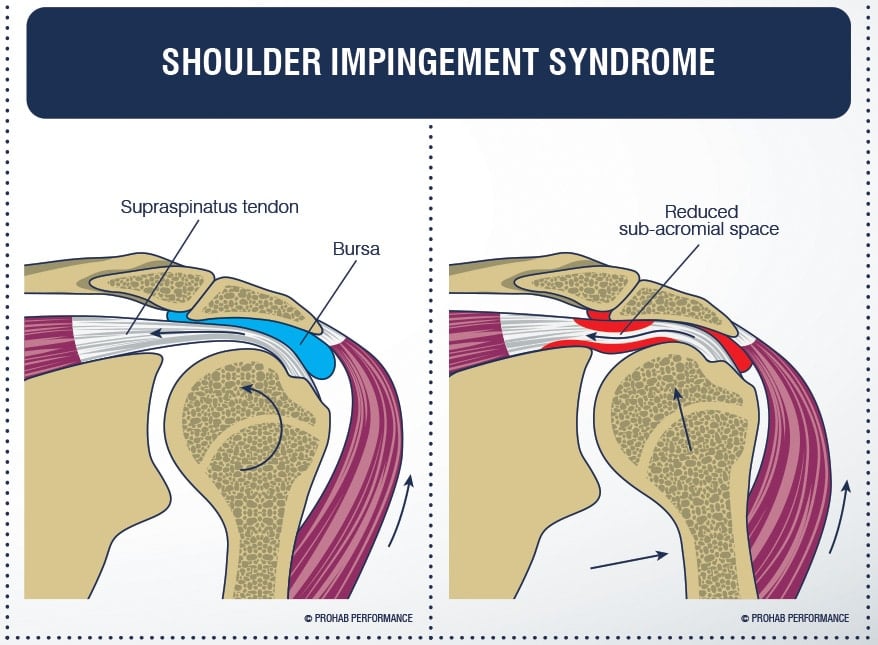 The space where your rotator cuff tendons and shoulder bursa reside becomes smaller when your arm is raised overhead. Impingement happens when the tendons of the rotator cuff get pinched in the bones of the shoulder.
Steps:
- While seated, have a partner raise the arm of your sore shoulder to the front and overhead as far as possible.
- Your partner should support your shoulder blade (scapula) with one hand and use the other hand to raise your arm.
If you experience shoulder pain while your arm is being raised, the impingement test is considered positive. The pain is probably caused by impingement of the tendons or bursa in that part of the shoulder.
4. Frozen Shoulder
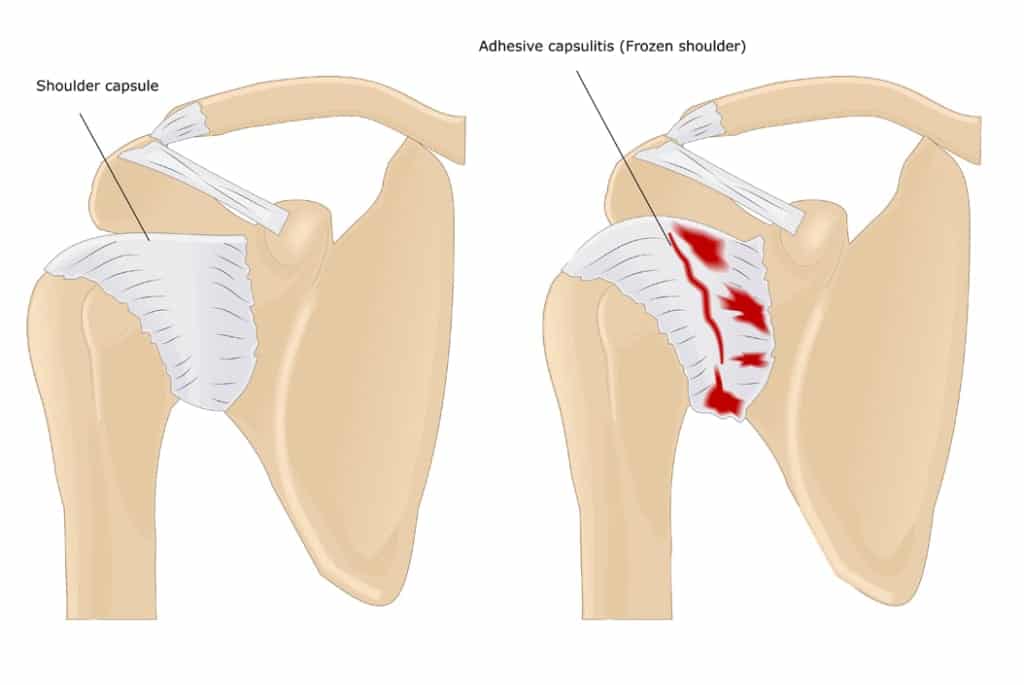
A frozen shoulder is one of the most common types of shoulder issues. It is also known as adhesive capsulitis. It usually occurs over time and can cause shoulder pain, tightness, and limit the functionality of your arm. A frozen shoulder can make it difficult for you to reach overhead and scratch your back.
A frozen shoulder cannot be diagnosed through an X-ray or MRI. It has to be examined by observing the troubled shoulder while it is moving through its range of motion.
Frozen Shoulder Test #1 Steps:
- Stand in front of your partner and ask them to observe you as you move your sore arm. Your partner should closely notice the range and quality of motion of the shoulder joint.
- Slowly raise both your arms to the front and overhead. If you are suffering from a frozen shoulder, you might only be able to lift your sore arm to a point just past parallel with the floor. Additionally, as your scapula elevates towards your ear, you might experience incremental shoulder pain.
- From the overhead position, slowly lower your arms down to the starting position.
- Lift your arms out to your sides. As with lifting your arms overhead, you might be suffering from a frozen shoulder if you are only able to lift your arms to a point parallel to the ground.
Frozen Shoulder Test #2 Steps:
- Stand with both arms extended straight at your sides so that they are parallel to the floor.
- Flex your elbows so that your upper arm is perpendicular to your lower arm.
- Rotate your arms outward.
- If you are suffering from a frozen shoulder, the painful arm will not rotate as far as the healthy shoulder.
Check Out: How To Fix Rounded Shoulders For Optimal Posture
5. Bicep Tendonitis
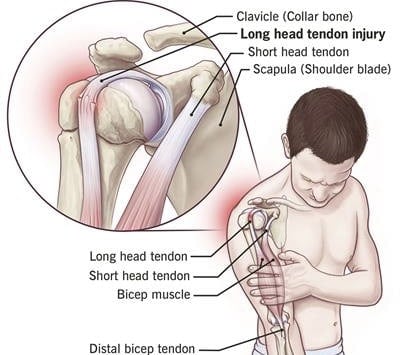
Bicep tendons are long and strong cord-like structures that connect the bicep muscle to the bone in the shoulder socket. Biceps tendinitis is an inflammation or irritation of the upper biceps tendon.
Steps:
- While seated, raise your sore arm forward so that it is parallel to the floor.
- While holding the position, turn your wrist so that your palm is facing the roof.
- Ask your partner to push your arm down, while you resist.
If you experience shoulder pain while resisting your partner’s attempt to lower your arm, you are probably suffering from bicep tendonitis.
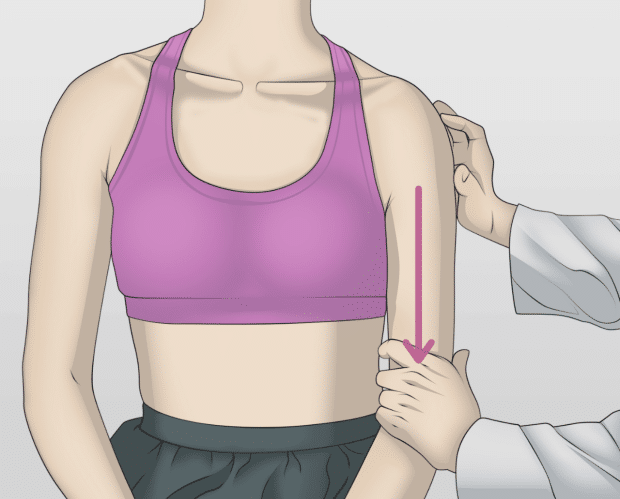
6. Rotator Cuff Tear
A rotator cuff is a group of muscles and tendons that hold the shoulder joint in place and allow you to move your arm and shoulder.
The rotator cuff includes the following muscles:
- Subscapularis
- Infraspinatus
- Supraspinatus (from the empty can test)
- Teres minor
These four muscles arise from the scapula and insert into the humerus. The tendons of the rotator cuff muscles blend with the joint capsule and form a musculotendinous collar that surrounds the posterior, superior, and anterior aspects of the joint, leaving the inferior aspect unprotected.
This shoulder set-up is a big reason behind most of the shoulder dislocations as the humerus slides inferiorly through the unprotected part of the joint.
During arm movements, the rotator muscles contract and prevent the sliding of the head of the humerus. This provides stability and a full range of motion to our shoulder joints.
While we wait for human evolution to catch up to this flaw, use the following test to determine if your shoulder pain is caused by a rotator cuff tear:
Steps:
- While seated, ask your partner to lift your painful arm to the side so that it is parallel to the floor.
- After a few seconds in this position, ask your partner to let your arm drop.
If you are unable to maintain the parallel position by yourself, your shoulder pain might be due to a rotator cuff tear.
Make sure you are not compensating for a torn rotator cuff by elevating the scapula towards your ear to hold the parallel position.
Related: These Exercises Are Key to Developing Great Shoulder Stability
7. Sulcus Test
The sulcus test is used to assess the glenohumeral joint (responsible for connecting the upper extremity to the trunk) for inferior instability due to a laxity of the superior glenohumeral ligament and coracohumeral ligament.
Note: This test is best performed by a trained professional. We would recommend passing on your friendly neighborhood brofessor‘s help for this test.
Steps:
- While seated, let your arms hang at your sides.
- Taking hold of your wrist or elbow, your practitioner pulls the arm down.
- While doing this, the healthcare professional is looking for the appearance of a small divot, or sulcus, at the top of your shoulder joint.
The presence of a sulcus is a sign that your shoulder might be pulling away from the socket, hence indicating shoulder instability.
8. AC Joint Separation
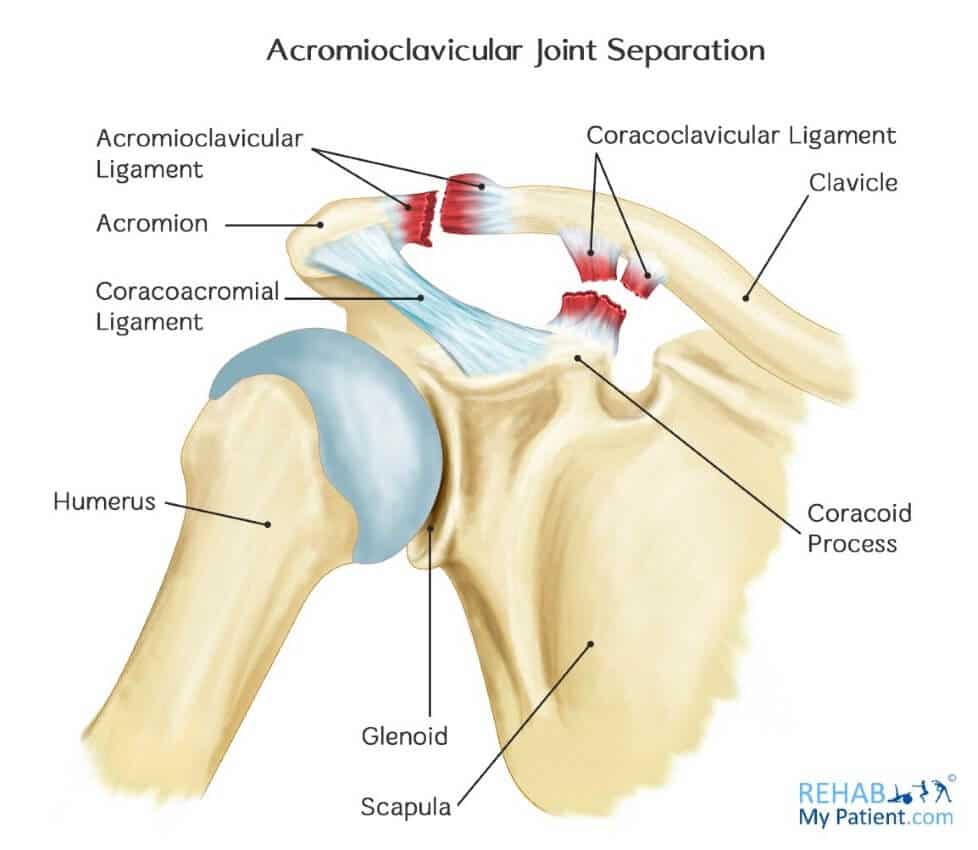
The acromioclavicular (AC) joint is a joint in the shoulder where two bones meet. One of these bones is the collarbone or clavicle. The second bone is a part of the shoulder blade (scapula), which is the big bone behind the shoulder that also forms part of the shoulder joint.
The AC joint is a plane-type synovial joint, which under normal physiological conditions allows only gliding movement. As it also attaches the scapula to the thorax, the AC joint allows an additional range of motion to the scapula and assists in arm movement such as shoulder flexion and abduction.
The AC joint may become separated in a traumatic event like a sports injury or a car accident. The test for an AC joint separation is called the AC joint compression test.
Steps:
- While seated, have your partner place one hand on the front of your shoulder and one hand on the back of your shoulder.
- They then push their hands together, compressing the AC joint.
If you experience shoulder pain, then the test is positive. Additionally, pain while raising the arm upward and while sleeping are also indications of an AC joint separation.
When to seek medical help?
Usually, shoulder pain is caused by the factors mentioned above and can be fixed at home with rest and ice. You could also bandage it to hold it in place if necessary or use a cuff or elbow support until you see improvement.
But you should not delay getting professional help if you experience heat and tenderness around the joints, shoulder deformity, fever, inability to move your shoulder, lasting bruising, numbness, or pain that persists beyond a few weeks of home treatment.
We do not want to be the article that relates everything to a possible heart attack (or cancer) but if your shoulder pain is intense and sudden and not related to an injury, call 911 immediately. It may be a sign of a stroke.
Do you perform shoulder-specific warmups before a workout? Let us know in the comments below.
Also, be sure to follow Generation Iron on Facebook, Twitter, and Instagram.